Upgrading NLM and/or NLRS
If you want to Upgrade to the latest version of NLRM, you need to uninstall existing utilities according to Windows NLM + NLRS Uninstallation Guide
After you’ve uninstalled existing utilities, follow the steps in Windows NLRM Installation Guide to install NLRM
Upgrade to latest NLRM 4.17
Prerequisites
Before starting the upgrade process, please ensure that you have
- the latest version of the NLRM installer (.msi file).
- license and authorization certificate if you do not already have valid ones.
Copy all the files to the server in which NLRM will be hosted.
If you want to Upgrade to the latest version of NLRM, you need to uninstall existing utilities following Windows NLM/NLRM Uninstallation Guide
Install NLRM
Launch the installer by double-clicking the .msi file. The .msi file has this format: NLRM-4.17-293-x86_64.msi.
Select the installation folder location. The default is C:\Autodesk\NLRM.
Note: Multi-byte character file paths (such as C:\Autodesk\おはよう) are not supported.
 Click Next and finish the installation.
Offline Servers
For Token Flex license servers which cannot connect to Autodesk directly, following additional setup is required.
Open a command prompt as administrator
Go to the location where NLRM is installed. The default location is C:\Autodesk\NLRM
Run this command to set transmit-mode:
nlrm_config.exe set transmit-mode manual
NLRM supports configuring offline duration allowance in days for license servers running in manual mode. Currently, we support offline duration allowance from 1 day to a maximum of 30 days. The license server administrator will need to export the usage data and transmit to Autodesk servers, before the configured offline duration allowance is elapsed since the last time usage was collected from the license server.
Note: If you update offline duration allowance days, then it is recommended to export and transmit all the usages collected till the date within the allowance period.
Please refer to the instructions here Submit usage data manually for collecting the data from the primary server and sending it manually from a secondary machine.
In some cases, you may need to reconfigure LMTOOLS.
NOTE: You can skip this step if you upgraded from a previous version of NLM/NLRM and have installed it in the same directory
Launch the LMTOOLS utility using one of the following methods:
- Run the LMTOOLS utility icon from the desktop
- Double-click lmtools.exe in the install folder
From the Config Services tab, create a service named Autodesk Network Licensing service (or choose your own service name). Ensure that:
- Paths to the lmgrd.exe, license and debug log files are configured correctly.
- "Use Services" is checked.
- "Start Server at Power Up" is checked.

Note: You no longer need to add the append mode (+) to the start of the selected debug log file (previously required for using NLRS as the reporting service).
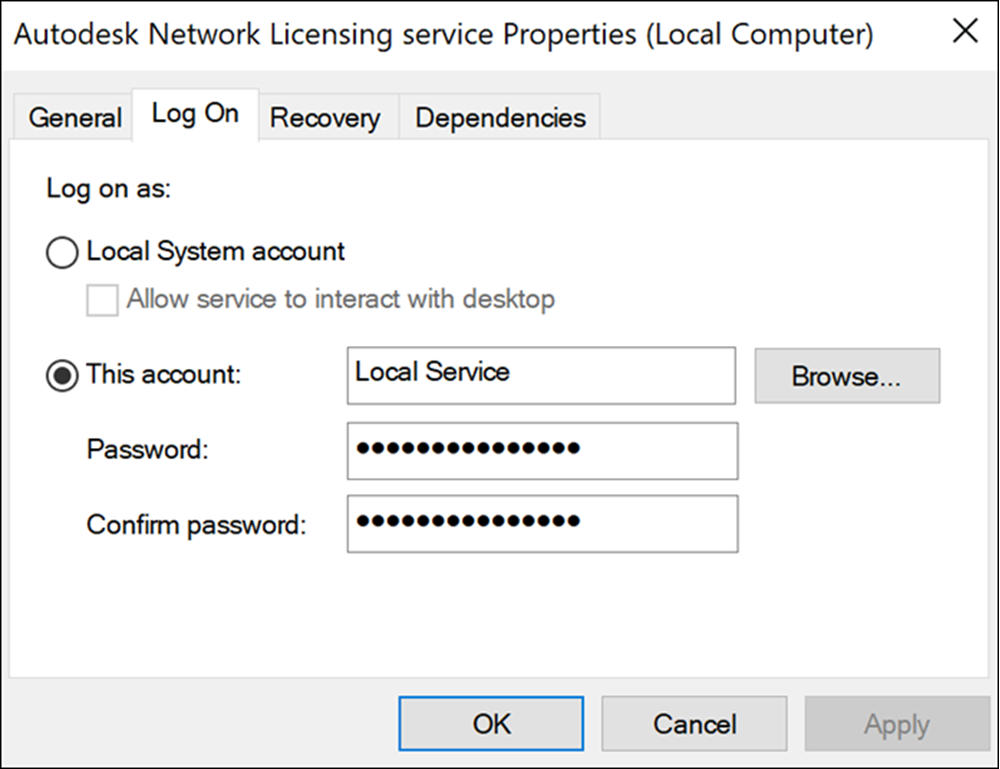
Ensure that the NLRM service user account references the account you intend to use. Although Local Service is the default value, it may not be correct for you.
Check the account settings and change them if necessary.
Open Windows Services Manager and double-click the NLRM service.
Select the Log On tab of Autodesk Network Licensing Service (or the service name you provided in LMTOOLS) Properties.
Verify the settings are correct. (They may have changed from the previous settings to Local Service.)
Update the settings if necessary.
Close the service properties window.
Additional version-wise steps for upgrade
Upgrading from NLRM v4.0 / v4.4
After uninstalling existing utilities and Installing NLRM, no additional setup is required. Proceed to Start NLRM.
Upgrading from NLRM v3.19
After uninstalling existing utilities and Installing NLRM, follow the below steps:
Configure the authorization certificate as below.
Launch the command prompt utility and navigate to the directory where NLRM is installed
Run the below command and follow the steps as directed on the screen (NLRM identifies and uses {HOSTNAME}.auth file if present in the NLRM installation directory, otherwise, you need to provide path to a valid auth file)
nlrm_config.exe update-auth
Note: The {HOSTNAME}.auth file is used to authenticate the server. As a security best practice, Autodesk recommends storing this file in a secure location and deleting the copy on the license server after installation.
Proceed to Start NLRM.
Upgrading from NLRM v3.14 or older
After uninstalling existing utilities and Installing NLRM, follow the below steps:
NLRM setup
The setup workflow will help you perform the following tasks as required:
- Installing the NLRM authorization certificate
- Configuring Personally Identifiable Information (PII) masking
- Configure customer email address
- Testing your connection
To start this workflow,
Open a command prompt as administrator
Go to the location where NLRM is installed. The default location is C:\Autodesk\NLRM
Run this command to initiate NLRM setup:
nlrm_config.exe setup
Complete setup by following the on-screen instructions.
Note:
- PII masking flag must be set and should be the same value as used in previous NLRS/NLRM installation.
- If the connection fails, please check the proxy and firewall settings
Proceed to Start NLRM.
Updating License
Follow the below steps to update license file:
Launch LMTOOLS by using one of the following methods:
- Run the LMTOOLS icon from the desktop
- Double-click lmtools.exe in the installation folder.
In the LMTOOLS configuration panel, select the Start/Stop/Reread tab.
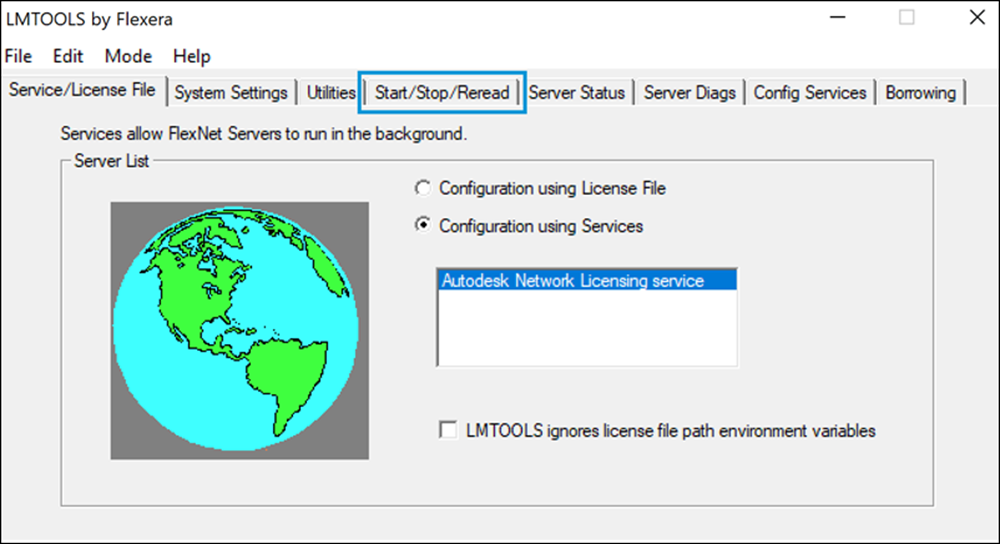 Check to see if there are any NLRM services running. Select each running service and stop it by clicking Stop Server.
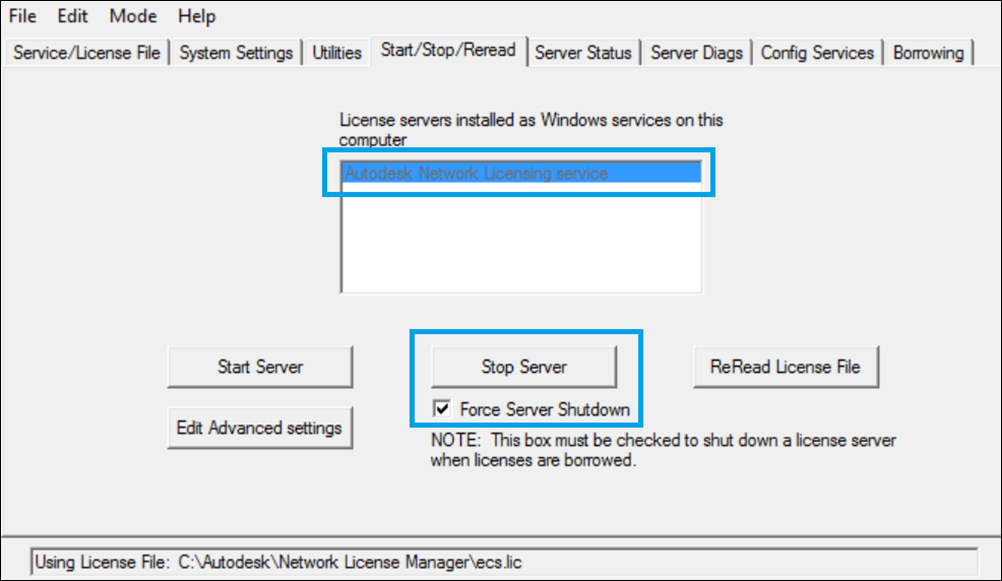
Note: It may take up to 60 seconds for each service to stop operation.
Proceed to Start NLRM.
Updating authorization certificate
Follow the below steps to update authorization certificate:
Start NLRM
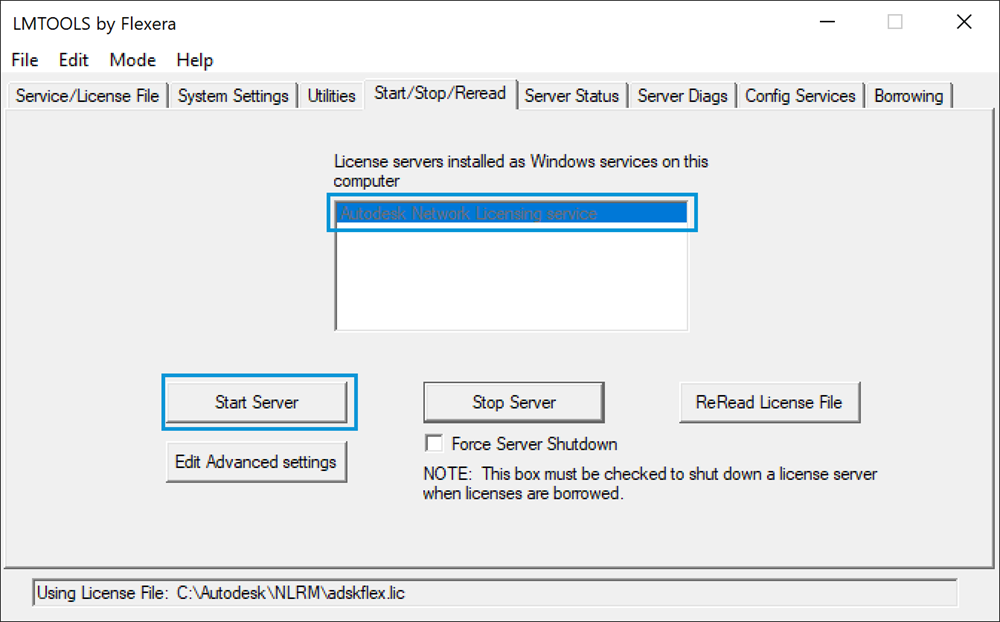
To start your license server, launch LMTOOLS by double clicking lmtools.exe in the NLRM installation folder.
From the Start/Stop/Reread tab of the LMTOOLS configuration panel, under Configuration Using Services, select Autodesk Network Licensing service (or service name that you have provided in the Config Services panel).
Click Start Server.
Verify that your license server is running successfully
When the license server starts, it automatically generates a license server start event. You can verify that your server is running by inspecting the application logs.
Online Server
An online license server sends a license server start event message back to Autodesk, which can be seen in the logs as below:
- In a text editor, open: %PROGRAMDATA%\Autodesk\NLRM\4.17\logs\collection_dispatcher_car-park.log
Note: This file is created almost immediately after the license server has started.
A complete segment of the log file should look similar to the following example. If it does, your license server has started, is running correctly and able to communicate with Autodesk successfully.
```
Starting Autodesk Collection Dispatcher v4.17 ...
Autodesk Server Url => https://car2.autodesk.com
Source => C:\ProgramData\Autodesk\NLRM\car.park
Re-dispatch Target => C:\ProgramData\Autodesk\NLRM\re
Log File => C:\ProgramData\Autodesk\NLRM\4.17\logs\collection_dispatcher_car-park.log
Initializing transmitter ...
Check for messages older than 2022-03-10 04:29:35.842564994 UTC , completed in 33.563µs
Starting to transmit data ...
Sending data: 1
[POST] https://car2.autodesk.com/api/v1/event
request => {"event_origin":{"application_info":{"name":"NLRM","version":"4.17"},...
response_code => 200
response => {"message":"Request has been successfully processed","time_to_next_request_ms":100}
collection_dispatcher::event_processor::web_transmit    Message processed successfully.
collection_dispatcher::event_processor::web_transmit    Message queue completed processing.
```
Offline Server
An offline license server creates a license server start event, which can be seen in the logs as below:
- In a text editor, open: %PROGRAMDATA%\Autodesk\NLRM\4.17\logs\collection_dispatcher_car-park.log
Note: This file is created almost immediately after the license server has started.
A complete segment of the log file should look similar to the following example. If it does, your offline license server has started, and is collecting usage data locally.
```
Starting Autodesk Collection Dispatcher v4.17 ...
Autodesk Server Url => https://car2.autodesk.com
Source => C:\ProgramData\Autodesk\NLRM\car.park
Re-dispatch Target => C:\ProgramData\Autodesk\NLRM\re
Transmit Mode => manual
Log File => C:\ProgramData\Autodesk\NLRM\4.17\logs\collection_dispatcher_car-park.log
Check for messages older than 2022-03-10 05:46:40.811245673 UTC , completed in 21.52µs
collection_dispatcher::event_processor::manual_transmit Message queue completed processing.
```
Parent page: About Network License and Reporting Manager (NLRM)
|
